DIY Cornhole Board Set: A Simple Guide to Mastering Backyard Fun
Get ready to amp up your backyard fun this summer by making your very own cornhole board set! Cornhole is an entertaining game that’s perfect for family gatherings, barbecues, and neighborhood get-togethers. In this simple, step-by-step guide, we'll walk you through the process of crafting a cornhole board set from scratch. So, grab your tools, and let's dive in!
Materials and Tools You'll Need
Before we begin, gather the following materials and tools:
1. Two 2' x 4' plywood boards (1/2" thick)
2. Four 2" x 4" x 8' lumber for the frame
3. 2 1/2" wood screws
4. Four 3/8" x 4" carriage bolts
5. Four 3/8" washers
6. Four 3/8" wing nuts
7. Wood glue
8. 120-grit and 220-grit sandpaper
9. Paint or stain (optional)
10. Primer (optional)
11. Jigsaw
12. Drill with a 3/8" bit
13. Tape measure
14. Pencil
15. Carpenter's square
16. Clamps
Step 1: Cut the Frame Pieces
First, cut your 2" x 4" x 8' lumber into the following lengths for each board:
- Two pieces at 48" (long sides)
- Two pieces at 21" (short sides)
You'll need a total of four 48" pieces and four 21" pieces to create both cornhole board frames.
Step 2: Assemble the Frame
Lay out your cut frame pieces on a flat surface. Position the short sides (21" pieces) inside the long sides (48" pieces) to form a rectangle. This will give you a frame measuring 24" x 48" on the outside. Secure the corners with wood glue and clamp the frame in place until the glue dries. Once dry, reinforce the corners with 2 1/2" wood screws.
Step 3: Attach the Plywood Surface
Place one of the 2' x 4' plywood boards on top of the completed frame, ensuring the edges are flush. Attach the plywood to the frame using wood glue and 2 1/2" wood screws, spacing the screws about 8" apart. Repeat this process for the second cornhole board.
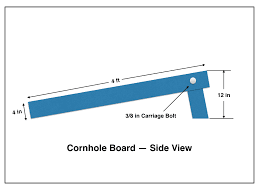
Step 4: Create the Leg Assemblies
Cut the remaining 2" x 4" lumber into four pieces, each measuring 12" long. These will serve as the legs for your cornhole boards. Round one end of each leg with a jigsaw to create a pivot point for attaching it to the frame.
Next, drill a 3/8" hole through the rounded end of each leg, approximately 1 3/4" from the top. Also, drill a 3/8" hole on each side of the frame, 3 1/2" down from the top and 2" in from the edge. Attach the legs to the frame using the carriage bolts, washers, and wing nuts.
Step 5: Cut the Cornhole
Measure and mark the center point of the hole for each cornhole board. The hole should be 9" down from the top and 12" in from each side. Use a compass or a round object with a 6" diameter to draw the circle. Carefully cut out the hole using a jigsaw.
Step 6: Sand and Finish
Sand the entire surface then paint. Apply at least 2 coats of paint or stain
If you would like an image or picture on your board we can make the vynal ready to be installed right here: https://www.cornholeboards.us/customdesign/70/custom-cornhole-prints-(no-boards)?